![]()
REQUIREMENT
contrib.replication
![]()
|
|
REQUIREMENT contrib.replication |
|
| Type | NEW |
| Priority | HIGH |
| Status | CLOSED |
| Topic | Replication is a plugin framework used to replicate data between database (RDBMS) sources and sinks. |
|
Des cription |
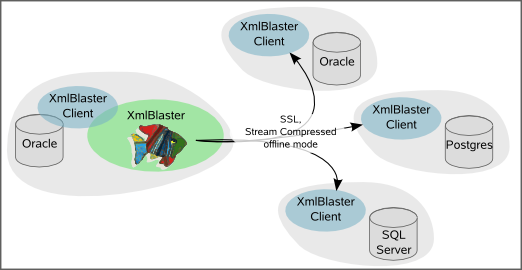
Replication OverviewThe Replication framework makes use of the DbWatcher- and the DbWriter frameworks. Its goal is to offer the xmlBlaster user a way to replicate data from one or several source databases to one or more sink databases. The framework has been designed for a singlemaster multislave approach. What does that mean ? It means that it does not offer any conflict resolution mechanism. In other words it is safe for cases where you have one master database, also called the source for the replication, and one or more slaves, also called the sinks of the replication or replicas. It will not be safe where you have more than one master. There are situations where this framework is currently used with more than one source for one sink, but there are limitations, for example you must ensure that the same data (at least on a row granularity) always comes from one single source.
 Which features does this framework offer ?
Why yet another replication solution when there are so many out there already ?
Since the framework is highly flexible, it is also quite complex. Probably the simplest way to describe it is with an easy tutorial. I will start with a very simple use case. Parallely a description of what is going on behind the scenes will also be given. Prerequisistes for this tutorial is that you have an oracle database up and running. The demo is also available as a Flash movie here.
Prepare, build and start the server
Start the Demo Client for the Replication
Start the JMX Monitor to initiate the ReplicationOpen an html browser of your choice, for example Firefox. Point it to http://localhost:9999. You will see something like the following:
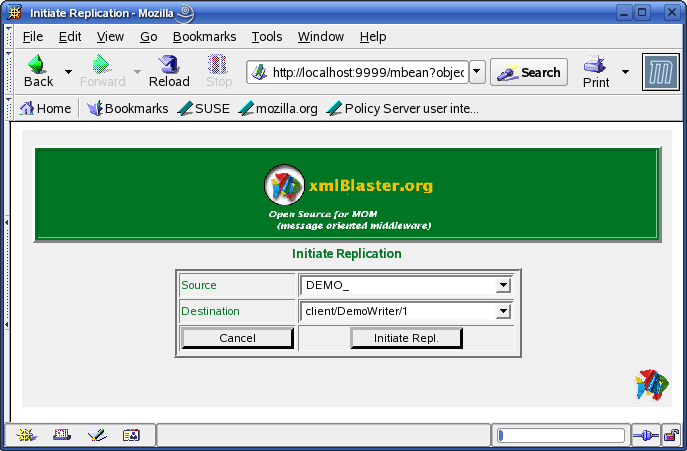
The Source (here DEMO_) is the prefix identifying the source of the replication. The Destination is the name identifying the Destination of the replication. In this demo you only have one possible combination allowed. So click on the Initiate Repl. Button. This way the replication will start. By clicking on the button you will be redirected to another page displaying all initiated and running replications. In this case you only have one single entry.
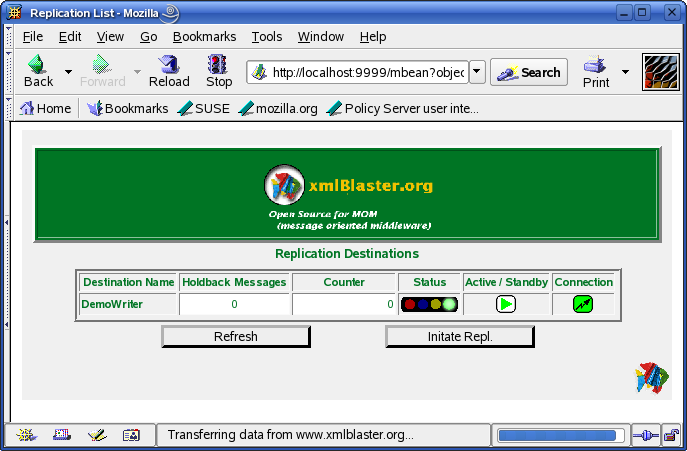
Note that the status is initially switching from blue to yellow. When it is in the blue phase (INITIAL), the source is prepared for the
replication. During this phase the Active/Standby Status is in Standby. This means the replication is temporarly hold back, no message
is sent to the destination. When all initial messages have been delivered, the status is switching again, this time from yellow to green (RUNNING). From now on the destination is ready and the initial data have been replicated. On the server logs you will see that the initial command has been executed and on the client logs you will see the PL/SQL Code of the trigger followed by a sequence of two XmlBlaster Messages each in xml format. The first of them is the CREATE statement itself and the second is the message containing all initial data of the replicated table. You can now verify that the new table DEMO_USERS_REPLICA really has been created and that it contains the same entries as the source by invoking on the prompt:
select * from demo_users_replica
This way you replicated data from one table to another.
|
| Configure |
NOTE: Configuration parameters are specified on command line (-someValue 17) or in the
xmlBlaster.properties file (someValue=17). See requirement "util.property" for details. |
| See API | org.xmlBlaster.contrib.dbwriter.DbWriter |
| See API | org.xmlBlaster.contrib.dbwatcher.DbWatcher |
| See API | org.xmlBlaster.contrib.replication.ReplicationAgent |
| See API | org.xmlBlaster.contrib.replication.ReplSlave |
| See API | org.xmlBlaster.contrib.replication.impl.ReplManagerPlugin |
| See | Replication Documentation |
| See REQ | contrib.dbwatcher |
| See REQ | contrib.dbwriter |
| See TEST | org.xmlBlaster.test.contrib.dbwriter.TestRecordParsing |
This page is generated from the requirement XML file xmlBlaster/doc/requirements/contrib.replication.xml